About
RGraph is a JavaScript charts library based on
HTML5 SVG and canvas. RGraph is mature (over 18 years
old) and has a wealth of features making it an ideal
choice to use for showing charts on your website.
Version 7.20
Version 7.20 (released in June 2026) is the
latest version of RGraph and the major change in
this version is an update to the default values
of properties making for better looking charts without
having to set any properties.
Read more about this and other changes in
the changelog.
Download
Get the latest version of RGraph (version 7.20, 9th June 2026) from
the download page. You can read the changelog here. There's also older versions available,
minified files and links to cdnjs.com hosted libraries.
Latest forum posts
These are the latest support forum posts that have been
posted or updated.
12th June, Marco
Should I use SVG or canvas for the charts on my website?
9th June, Richard
New version of RGraph: version 7.20
3rd June, Patrick
Question about installing RGraph
1st June, Ouja
How do I add a click event to a bar in my Bar chart?
8th May, Anthony Kuma
Does the SVG Line chart have outofbounds functionality?
License
RGraph can be used for free under the GPL or if
that doesn't suit your situation there's an
inexpensive (£129) commercial license available.The upcoming SQLite Editor for PHP administration tool
Written by Richard Heyes, RGraph author, on 6th June 2026- Itroduction
- What does it look like on the page?
- What does the code that I have to specify look like?
- When will it be available?
Introduction
The SQLite Editor for PHP tool is a PHP-based library that allows you to quickly create administration interfaces to allow you to maintain your SQLite database tables. It doesn't allow you to do things like add/edit/remove tables, views, triggers etc so it's something that can be used to provide interfaces to your users enabling them to edit (or just view) the data in your database. It's used behind the scenes on the RGraph website and I've now decided to clean it up and release it for general use. The license is the same as SQLite itself - ie part of the public domain and entirely free to use with no exceptions or conditions.What does it look like on the page?
Here's a screenshot of an example instance of the editor: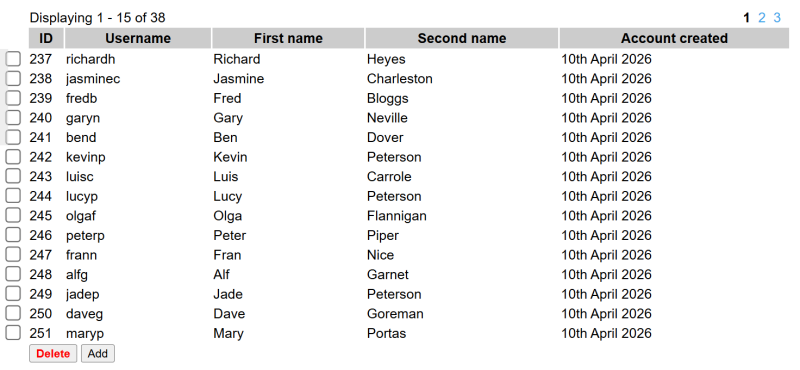
What does the code that I have to specify look like?
Here's a sample of the creation of such an editor. All of the options are optional except for the filename and the table. Even the sql_select option is not required as it defaults to showing all of the data in the table.
<?php
    $editor = new SQLiteEditor([

        // The database path and filename.
        'filename' => './my.db',

        // The table to edit. Must be a regular table (ie not
        // a view).
        'table' => 'accounts',

        // The query to use to fetch the rows that are to be
        // displayed. By default, all of the rows from the table
        // are selected. The query below is an example of only
        // choosing rows where the deleted column is null.
        //
        // 'sql_select' => "SELECT id,
        //                         username,
        //                         created,
        //                         deleted
        //                    FROM accounts
        //                   WHERE deleted IS NULL",

        // The query that's used to add a new row into the
        // database. The default is to insert a row into the
        // database where the only field that's specified is the
        // primary key (the value given for this is null). If this
        // option is set to null, 0 or an empty string then adding
        // a new row is disabled.
        //
        // 'sql_add' => 'INSERT INTO accounts (created) VALUES (CURRENT_DATE)',

        // The sql_add option can also be a function which is
        // called when the add button is pressed, allowing you to
        // run multiple queries, perform additional tasks or log the
        // addition as required.
        //
        // 'sql_add' => function ($editor)
        // {
        // },

        // The sql_delete option allows you to specify the SQL
        // that will be used in order to delete one or multiple rows.
        // The {ids} macro will be replaced with a comma separated
        // list of the selected IDs. The query is LIMITed to however
        // many IDs that there are. You can set this to null, an
        // empty string or 0 (zero) to disable deleting.
        //
        // 'sql_delete' => "DELETE FROM accounts WHERE id IN({ids}) LIMIT {count}",

        // The sql_delete option can also be a function which is
        // called, allowing you to perform other tasks or queries or log
        // the delete when deleting rows.
        //
        // 'sql_delete'   => function ($editor)
        // {
        // },

        // The UPDATE query allows you to give the SQL query
        // that's used when updating a row in the database. There
        // are these macros that are available to you when this
        // happens:
        //
        //   {primary_key} The name of the column which is a unique
        //                 identifier for this table
        //   {column}      The column name that's going to be updated
        //   {value}       The new value that will be set
        //   {id}          The ID of the row that will be updated
        //
        // 'sql_update'   => "UPDATE accounts SET {column} = {value} WHERE {primary_key} = {id} LIMIT 1",

        // The sql_update option can also be a function that's
        // called allowing you to either run multiple queries and/or
        // perform other tasks that may be required (eg log the
        // update).
        //
        // 'sql_update' => function ($editor, $column, $data, $index, $primary_key)
        // {
        //     Remember the update function is run as part of an
        //     AJAX request so you won't see any output. Therefore
        //     you must log things to the console (using console.log() )
        //     in order to see them.
        // },

        // When deleting is disabled the checkboxes on the
        // left-hand-side of each row are not shown. By setting
        // this option to true you can re-enable them (you may
        // want them if you're adding your own buttons/actions
        // using the 'actions' option.).
        //
        // 'checkboxes' => true,

        // If this is set to true then responses to the edit
        // request will be logged to the browser console.
        //
        // 'edit_log_response' => true,

        // This option allows you to add HTML underneath the editor.
        // This is intended for you to use as a way to add buttons
        // underneath the editor but you could specify any HTML you
        // wanted - eg an image with an onclick event listener or a
        // dropdown list that contains many options. There's a
        // JavaScript function called SQLLiteEditor_getChecked(event)
        // that you can use in the click event to get a list of the
        // rows that were selected (this function returns the IDs of
        // those rows).
        //
        // 'actions' => [
        //     '<button onclick="event.preventDefault();checked = SQLLiteEditor_getChecked(event);if (checked.length) {location.href = `foo.html?ids=` + checked.join(`,`);} else {alert(`Nothing checked!`);}"><b>Go to foo!</b></button>',
        //     '<button onclick="event.preventDefault();checked = SQLLiteEditor_getChecked(event);if (checked.length) {location.href = `bar.html?ids=` + checked.join(`,`);} else {alert(`Nothing checked!`);}"><b>Go to bar!</b></button>'
        // ],

        // This option is just like the style option in the
        // datagrid library and the RGraph chart libraries - it
        // allows you to add CSS to the page that you want to use
        // to customise the editor.
        //
        // 'styles'       => [
        //     'div#sqliteeditor-container {}',
        //     'div#sqliteeditor {font-family: Arial;}',
        //     'div#sqliteeditor tbody input[type=checkbox] {transform:scale(1.5);cursor:pointer;}',
        //     'div#sqliteeditor tbody tr td:nth-child(1) {text-align: center;}',
        //     'div#sqliteeditor tbody tr td:nth-child(5) {text-align: center;}',
        //     'div#sqliteeditor tbody tr td button:hover {cursor:pointer;}',
        //     'div#sqliteeditor tbody tr td:nth-child(5) {text-align: left;}'
        // ],

        // This allows you to control whether a title attribute
        // is added to the relevant data cell in the table. You can
        // use this to disable tooltips on cells that contain (for
        // example) HTML.
        //
        // 'column_tooltips' =>[
        //     'actions'  => false
        // ],

        // Use this to set specific widths on certain columns. For
        // example your first column might be an ID column which may
        // contain just a number. If this is the case you can use
        // this option to stipulate that that column is only a set
        // number of pixels wide - leaving the rest of the width
        // available to the other columns.
        //
        // 'column_widths' => [30],

         // Instead of showing the actual column names to the user
        // you can use this option to provide some friendlier names
        // for them. These are used as the column headers.
        //
        // 'column_names' => [
        //     'id'       => 'ID',
        //     'username' => 'Username',
        //     'password' => 'Password',
        //     'created'  => 'Created',
        //     'deleted'  => 'Deleted'
        // ],

        // The column_callbacks option can be used to provide a
        // function that's used to modify or customise the data
        // when the row is displayed. The two examples that are
        // shown here for the created and deleted columns take the
        // value that's in the database (which in this case is an
        // SQL date) and format it into a more readable format. The
        // value that's returned from the function is used as the
        // value that's shown to the user even if there is no value
        // that's returned. So if you specify a callback for a
        // particular column a value must be returned otherwise you
        // will see nothing in that column.
        //
        //'column_callbacks' => [
        //    'created' => function ($editor, $row, $column, $value)
        //    {
        //        if ($value) {
        //            return date('jS F Y', strtotime($value));
        //        }
        //    },
        //    'deleted' => function ($editor, $row, $column, $value)
        //    {
        //        if ($value) {
        //            return date('jS F Y', strtotime($value));
        //        }
        //    }
        //]
    ]);
?>
When will it be available?
Soon! As of June 5th 2026, I've got another release of RGraph to get through first - but then I'll be able to concentrate more on this and get to a point where I'll be able to release it.